Shopify store owners – are you ready to step up your Facebook advertising game? You’ll first need to find out: what is and how to set up Facebook Pixel? Facebook Pixel is a powerful tool that can assist you in tracking the actions of website visitors and optimizing your Facebook ads for maximum conversions. But how do you integrate it into your Shopify store and start with Facebook Pixel installation?
If you’re keen to level up on Shopify, let us walk you through the process of installing Facebook Pixel on your Shopify store. Thankfully, it’s a simple, fuss-free process that any Shopify store owner can easily learn.
Whether you’re new to Shopify or a seasoned pro, our tutorial will walk you through the steps of integrating the Facebook Pixel and using it to increase traffic and sales to your store.
Don’t miss out on the advantages of this vital marketing tool. Read on to find out how to set up Facebook Pixel in this installation guide.
What is Facebook Pixel?
Those unfamiliar with Facebook Pixel may find themselves wondering – what is Facebook Pixel? We’re here to provide some clarity and show you how it can be a great companion in your business growth.
All Shopify business owners can benefit from the knowledge of what Facebook Pixel is, how to install it, and how to leverage it to grow a Shopify business. To put it simply, you can install Facebook Pixel onto your Shopify store by inserting a piece of code. After you install the code, the Facebook Pixel will then track essential traffic data which reveals key statistics on your store’s visitors, buyers and more. Hence, installing the Facebook Pixel on your Shopify store could prove to be a huge game-changer and help grow your business exponentially.
Not entirely convinced that installing Facebook Pixel is essential? You might catch yourself surprised at the fact that Facebook Pixel installation enhances your ad optimization. For any Shopify store owner who’s serious about revenue, growth, and profits, this should be a top priority.
And you might wonder – what is it useful for? Why should I set up Facebook Pixel?
Installing the Facebook Pixel on your Shopify store can reap many benefits. Firstly, you may use it to track visitor activity in your store and use these insights to enhance your marketing initiatives. Some of the primary advantages of installing the Facebook Pixel code include the ability to track conversions across various device types (desktop, mobile and more), develop lookalike audiences, as well as putting together and executing retargeting ad campaigns. In addition to these features, you’ll also be able to track a range of visitors’ actions. These include, but are not limited to, the number of store visits, add-to carts, and checkouts, as well as other sales data.
![]()
Facebook Pixel code
While not every Shopify store owner may be well-acquainted with coding, it’s actually rather simple to understand, find and install a Facebook Pixel code. If you want to set up Facebook Pixel, you can do so in a matter of minutes.
Want to find out how to set up Facebook Pixel? It is most important to understand what the Facebook Pixel code is. It is a piece of JavaScript code that is added to your Shopify store, assisting you with tracking visitors’ activities after being directed to your site through Facebook ads. The code is enabled by Facebook cookies and gives Facebook the data necessary to associate website visits with relevant Facebook user accounts. Therefore, Shopify store owners will be able to monitor users’ actions in Ads Manager. This provides powerful and actionable data about their conversion routes.
Hence, using the data obtained via Facebook Pixel, you can optimize and improve your existing ad campaigns. Your advertising efforts can then be more effectively targeted.
Installation and set up Facebook Pixel
If you do not know how to setup Facebook Pixel on Shopify, there are a few steps to follow.
Create your Facebook Pixel
Before you start your setup Facebook Pixel Shopify process, you need to log into your Facebook Events Manager to actually create the Pixel. Once you have logged in, expand the menu and select “Connect Data Sources”. You can easily find this option as it is a bright green button with a plus symbol as shown below:
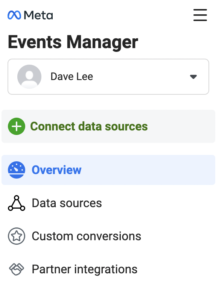
You will have different data sources to choose from after you click on “Connect Data Sources”. These include Web, App, Offline, and CRM. You’ll want to go ahead and select Web, then click on Facebook Pixel and Connect.
Once you’ve followed all of the above-outlined steps, you’re ready to name your Pixel. While your Pixel’s name won’t have any actual impact on performance or tracking, it can be handy later on if you name it properly, especially if you have many Shopify stores and need proper organization.
Finally, there is the opportunity for you to key in your Shopify store URL, which is an optional feature. This comes in the form of a box that writes “Check your website for easy setup options”. Though this is optional, it provides seamless integration between Facebook Pixel and Shopify, so you will be able to easily complete your Shopify setup Facebook Pixel.
![]()
Add and set up Facebook Pixel to your Shopify store
Created your Facebook Pixel successfully? Great! The next step is to actually add it to your Shopify store. If you already added it via the easy setup option, you can skip this step.
Otherwise, head on over to your Shopify admin dashboard. Once you’re there, go into your Settings and select Apps and Sales Channels. This should give you a list of options, and you can then click on Facebook.
Thereafter, click on the Open sales channel. This will give you the option to go into Settings and choose Data sharing settings.
Given that you’re using Facebook Pixel to track crucial marketing data, don’t forget to enable data-sharing and click on the toggle to enable it. From there, you’ll have three data-sharing levels to choose from – namely Standard, Enhanced or Maximum. Choose your Pixel and finally, click on Confirm to finalize your changes.
These are the necessary steps you’ll have to take to successfully complete the Facebook Pixel installation. Once you’ve completed this step, you’re done with Facebook Pixel set up and ready to get the insights you need for e-commerce victory!
How to delete Facebook Pixel after you set up Facebook Pixel
While the Facebook Pixel is extremely useful for most Shopify store owners, not everyone may find it useful. Here are some reasons why a Shopify store owner may be keen on deleting Facebook Pixel from Shopify:
May slow down Shopify site: One reason why store owners may go through with deleting Facebook Pixel is store loading time. Though the effect is minimal, some store owners may find that installing a Facebook Pixel compromises their site loading time. In this case, they may decide it is not worth installing Facebook Pixel on their Shopify stores.
Using other tracking methods: With the plethora of data tracking tools available on the web, not every store needs Facebook Pixel to gather necessary intel. Shopify business owners who have other ways to get the data they need may not find it as useful and find themselves deleting Facebook Pixel.
Revamping ad strategy: Whether a Shopify business decides to switch marketing tactics or use different ad channels, using a Facebook Pixel may no longer be as relevant or useful. In this case, they may end up deleting Facebook Pixel.
![]()
Delete Facebook pixel
So you’ve actually decided to delete Facebook Pixel from your Shopify store. Or perhaps you want to install a different Pixel and need to remove one that was previously installed. If you want to know how to delete Facebook Pixel, read on.
There are a few steps involved when it comes to deleting Facebook Pixel from Shopify. Firstly, log into your Shopify admin dashboard. Select “Facebook” and go into Settings, then opt for Data sharing settings. Here, you’ll want to select Disconnect to remove the Facebook Pixel from your Shopify store.
However, it doesn’t just end there. The Facebook Pixel code may also be embedded in the theme.liquid file, and you need to go into Online Store and Themes to edit the code. Click on the “theme.liquid” file, find your Facebook Pixel code and make sure you remove it before you save all changes that have been made.
And that’s all it takes to know how to delete Facebook Pixel from Shopify!
Conclusion
As we have demonstrated, the Facebook Pixel setup is fuss-free and advantageous for your Shopify store. With Facebook Pixel, you can start making informed decisions on marketing and ad campaigns. This allows you to optimize your budgets for higher returns. If your goal is to grow your Shopify business and obtain useful data, you might want to consider installing Facebook Pixel on your Shopify store. Facebook Pixel set up is easy and intuitive.
Having other tools to enhance your workflow and Shopify system can also be greatly beneficial. For example, there are various e-commerce inspector tools available for you to get competitor data and intelligence. In turn, you will be able to assess what competitors are doing to stay consistent and ahead of the curve.
Koala Inspector is one such tool you wouldn’t want to miss out on. By using Koala Inspector, e-commerce business owners like yourself may seek inspiration for business growth. This can be done by leveraging competitor knowledge of what works well for other competitors in the same niche. Using Koala Inspector, you can glimpse into the tactics employed by other Shopify store owners to succeed. Additionally, staying informed and ahead of trends and developments in the e-commerce sector by tracking and following other shops is helpful.
Stop wondering how your competitors are achieving lasting success and unlock the secrets to Shopify’s success! Now that you know how to set up Facebook Pixel, download Koala Inspector today to get started and start your Facebook Pixel set up now.